Custom OG Images(自定义 OG 图片)发射器插件会为你的页面自动生成社交媒体预览图片。它使用 satori 将 HTML/CSS 转换为图片,让你为内容创建美观且一致的社交媒体预览卡片。
Note
关于如何添加、移除或配置插件,请参阅 配置 页面。
功能特性
- 自动为每个页面生成社交媒体预览图片
- 支持亮色和暗色主题
- 可通过 frontmatter 属性自定义
- 需要时可回退到默认图片
- 通过自定义组件完全控制图片设计
配置
信息
你的 configuration 中必须正确设置
baseUrl属性,社交图片需要绝对路径才能正常工作。
该插件支持以下配置选项:
import { CustomOgImages } from "./quartz/plugins/emitters/ogImage"

const config: QuartzConfig = {
  plugins: {
    emitters: [
      CustomOgImages({
        colorScheme: "lightMode", // 生成图片时使用的配色方案,与主题色一致,可选 "darkMode" 或 "lightMode"
        width: 1200, // 生成图片的宽度(像素)
        height: 630, // 生成图片的高度(像素)
        excludeRoot: false, // 是否排除 "/" 首页不自动生成图片(false=自动,true=使用默认 og 图片)
        imageStructure: defaultImage, // 使用的自定义图片组件
      }),
    ],
  },
}
配置选项
| 选项 | 类型 | 默认值 | 描述 |
|---|---|---|---|
colorScheme | string | ”lightMode” | 生成图片时使用的主题(“darkMode” 或 “lightMode”) |
width | number | 1200 | 生成图片的宽度(像素) |
height | number | 630 | 生成图片的高度(像素) |
excludeRoot | boolean | false | 是否排除首页不自动生成图片 |
imageStructure | component | defaultImage | 用于生成图片的自定义组件 |
Frontmatter 属性
以下属性可用于自定义你的链接预览:
| 属性 | 别名 | 说明 |
|---|---|---|
socialDescription | description | 用于预览的描述。 |
socialImage | image, cover | 预览图片的链接。 |
socialImage 属性应包含一张图片的链接,可以是相对于 quartz/static 的路径,也可以是完整的 URL。如果你将所有图片放在 quartz/static/my-images 文件夹下,socialImage 示例为 "my-images/cover.png"。也可以直接使用完整 URL,如 "https://example.com/cover.png"。
信息
封面图片的优先级如下:
frontmatter 属性 > 自动生成图片(如启用)> 默认图片。默认图片(
quartz/static/og-image.png)仅在没有其他设置时作为回退。如果启用了 Custom OG Images 插件,它会成为每页的新默认图片,但可以通过为该页面设置socialImagefrontmatter 属性覆盖。
自定义
你可以通过传递自定义组件给 imageStructure,完全自定义生成图片的外观。该组件接收 JSX 及部分页面元数据/配置选项,并通过 satori 转换为图片。Vercel 提供了一个在线预览工具,可用于预览你的 JSX 设计,非常适合原型设计。
字体
你还会收到一个包含标题和正文字体的数组(第一个为标题,第二个为正文)。字体与 quartz.config.ts 中 theme.typography.header 和 theme.typography.body 选择的字体一致,并以 satori 所需格式传递。要在 CSS 中使用,使用 .name 属性(如 fontFamily: fonts[1].name 使用“正文”字体)。
以下是一个使用标题字体的组件示例:
export const myImage: SocialImageOptions["imageStructure"] = (...) => {
  return <p style={{ fontFamily: fonts[0].name }}>Cool Header!</p>
}
本地字体
如果你在
static文件夹下使用本地字体,请确保在custom.scss中设置正确的@font-facecustom.scss @font-face { font-family: "Newsreader"; font-style: normal; font-weight: normal; font-display: swap; src: url("/static/Newsreader.woff2") format("woff2"); }然后在
quartz/util/og.tsx中这样加载 Satori 字体:quartz/util/og.tsx import { joinSegments, QUARTZ } from "../path" import fs from "fs" import path from "path" const newsreaderFontPath = joinSegments(QUARTZ, "static", "Newsreader.woff2") export async function getSatoriFonts(headerFont: FontSpecification, bodyFont: FontSpecification) { // ... 其余实现保持不变 const fonts: SatoriOptions["fonts"] = [ ...headerFontData.map((data, idx) => ({ name: headerFontName, data, weight: headerWeights[idx], style: "normal" as const, })), ...bodyFontData.map((data, idx) => ({ name: bodyFontName, data, weight: bodyWeights[idx], style: "normal" as const, })), { name: "Newsreader", data: await fs.promises.readFile(path.resolve(newsreaderFontPath)), weight: 400, style: "normal" as const, }, ] return fonts }这样你就可以在自定义结构中使用该字体了。
示例
以下是一些可用作起点的图片组件示例:
基础示例
该示例生成的图片如下所示:
| 亮色 | 暗色 |
|---|---|
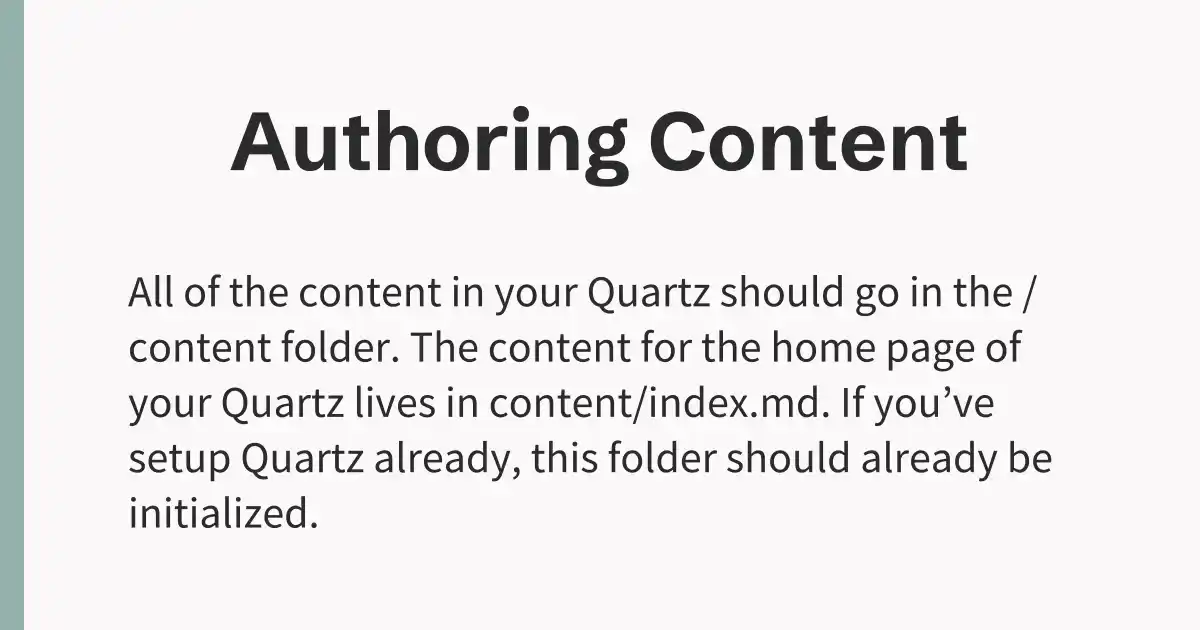 | 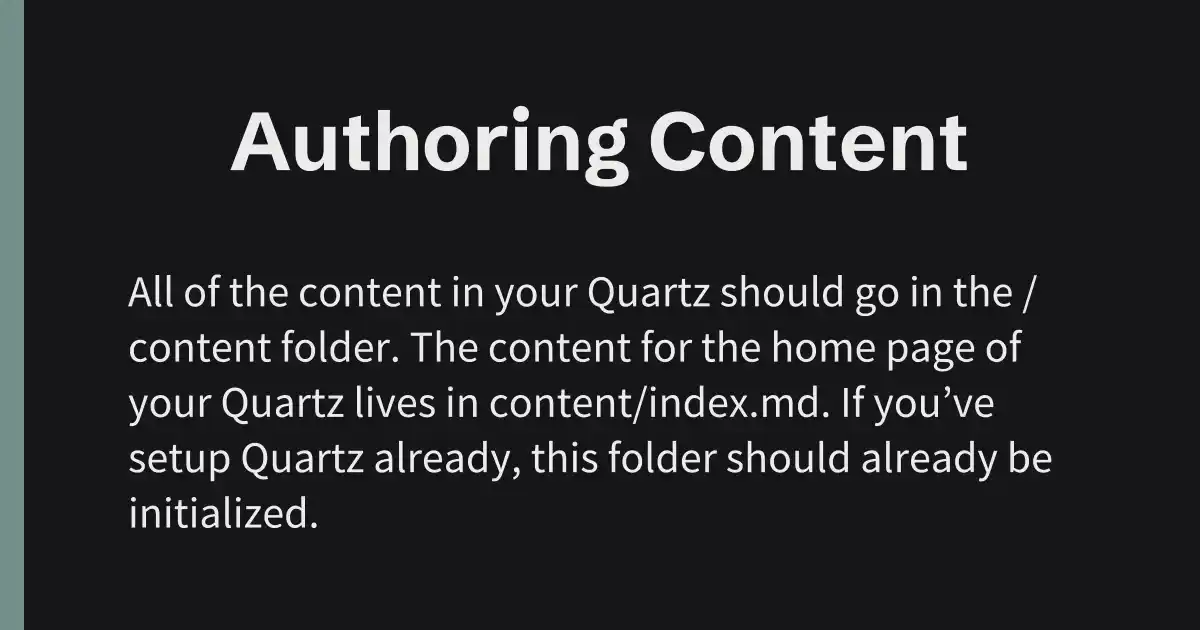 |
import { SatoriOptions } from "satori/wasm"
import { GlobalConfiguration } from "../cfg"
import { SocialImageOptions, UserOpts } from "./imageHelper"
import { QuartzPluginData } from "../plugins/vfile"

export const customImage: SocialImageOptions["imageStructure"] = (
  cfg: GlobalConfiguration,
  userOpts: UserOpts,
  title: string,
  description: string,
  fonts: SatoriOptions["fonts"],
  fileData: QuartzPluginData,
) => {
  // 超过多少字符切换为小号字体
  const fontBreakPoint = 22
  const useSmallerFont = title.length > fontBreakPoint

  const { colorScheme } = userOpts
  return (
    <div
      style={{
        display: "flex",
        flexDirection: "row",
        justifyContent: "flex-start",
        alignItems: "center",
        height: "100%",
        width: "100%",
      }}
    >
      <div
        style={{
          display: "flex",
          alignItems: "center",
          justifyContent: "center",
          height: "100%",
          width: "100%",
          backgroundColor: cfg.theme.colors[colorScheme].light,
          flexDirection: "column",
          gap: "2.5rem",
          paddingTop: "2rem",
          paddingBottom: "2rem",
        }}
      >
        <p
          style={{
            color: cfg.theme.colors[colorScheme].dark,
            fontSize: useSmallerFont ? 70 : 82,
            marginLeft: "4rem",
            textAlign: "center",
            marginRight: "4rem",
            fontFamily: fonts[0].name,
          }}
        >
          {title}
        </p>
        <p
          style={{
            color: cfg.theme.colors[colorScheme].dark,
            fontSize: 44,
            marginLeft: "8rem",
            marginRight: "8rem",
            lineClamp: 3,
            fontFamily: fonts[1].name,
          }}
        >
          {description}
        </p>
      </div>
      <div
        style={{
          height: "100%",
          width: "2vw",
          position: "absolute",
          backgroundColor: cfg.theme.colors[colorScheme].tertiary,
          opacity: 0.85,
        }}
      />
    </div>
  )
}
高级示例
以下示例包含自定义背景和格式化日期的社交图片:
export const og: SocialImageOptions["Component"] = (
  cfg: GlobalConfiguration,
  fileData: QuartzPluginData,
  { colorScheme }: Options,
  title: string,
  description: string,
  fonts: SatoriOptions["fonts"],
) => {
  let created: string | undefined
  let reading: string | undefined
  if (fileData.dates) {
    created = formatDate(getDate(cfg, fileData)!, cfg.locale)
  }
  const { minutes, text: _timeTaken, words: _words } = readingTime(fileData.text!)
  reading = i18n(cfg.locale).components.contentMeta.readingTime({
    minutes: Math.ceil(minutes),
  })

  const Li = [created, reading]

  return (
    <div
      style={{
        position: "relative",
        display: "flex",
        flexDirection: "row",
        alignItems: "flex-start",
        height: "100%",
        width: "100%",
        backgroundImage: `url("https://${cfg.baseUrl}/static/og-image.jpeg")`,
        backgroundSize: "100% 100%",
      }}
    >
      <div
        style={{
          position: "absolute",
          top: 0,
          left: 0,
          right: 0,
          bottom: 0,
          background: "radial-gradient(circle at center, transparent, rgba(0, 0, 0, 0.4) 70%)",
        }}
      />
      <div
        style={{
          display: "flex",
          height: "100%",
          width: "100%",
          flexDirection: "column",
          justifyContent: "flex-start",
          alignItems: "flex-start",
          gap: "1.5rem",
          paddingTop: "4rem",
          paddingBottom: "4rem",
          marginLeft: "4rem",
        }}
      >
        <img
          src={`"https://${cfg.baseUrl}/static/icon.jpeg"`}
          style={{
            position: "relative",
            backgroundClip: "border-box",
            borderRadius: "6rem",
          }}
          width={80}
        />
        <div
          style={{
            display: "flex",
            flexDirection: "column",
            textAlign: "left",
            fontFamily: fonts[0].name,
          }}
        >
          <h2
            style={{
              color: cfg.theme.colors[colorScheme].light,
              fontSize: "3rem",
              fontWeight: 700,
              marginRight: "4rem",
              fontFamily: fonts[0].name,
            }}
          >
            {title}
          </h2>
          <ul
            style={{
              color: cfg.theme.colors[colorScheme].gray,
              gap: "1rem",
              fontSize: "1.5rem",
              fontFamily: fonts[1].name,
            }}
          >
            {Li.map((item, index) => {
              if (item) {
                return <li key={index}>{item}</li>
              }
            })}
          </ul>
        </div>
        <p
          style={{
            color: cfg.theme.colors[colorScheme].light,
            fontSize: "1.5rem",
            overflow: "hidden",
            marginRight: "8rem",
            textOverflow: "ellipsis",
            display: "-webkit-box",
            WebkitLineClamp: 7,
            WebkitBoxOrient: "vertical",
            lineClamp: 7,
            fontFamily: fonts[1].name,
          }}
        >
          {description}
        </p>
      </div>
    </div>
  )
}